
How to use these guides
The articles in this series, which can be torn out for use in practice, are intended to support clinician development and to assist in the overall assessment of patient presentations. The information should be used to aid consideration of differential diagnoses in situations where life-threatening conditions have been ruled out.
The extent and explanation of each examination will not be to the depth of those provided in core literature texts, so further reading and consolidation are advised to support understanding supplemental to these articles. Key questions are included for reader consideration and to direct further study.
Most examinations are taught in a rigid format. However, in clinical practice, practitioners need to be flexible and adapt their approach depending on the presenting condition and circumstances. While there is no single set way to carry out each of these examinations, a good structure will reduce omissions and errors, and support the gathering of information to inform patient care.
Contemporary texts provide the underpinning reference sources throughout this series, as many of the examination processes and techniques are universally applied; however, differences will be highlighted. Readers will be signposted to these key texts for each clinical examination.
The series will cover the following systems:
This article gives an overview of the gastrointestinal (GI) examination and provides a structure.
It is important to gain informed consent from the patient (Baker, 2016; Bickley and Szilagyi, 2017). Explain each element of the examination and give the patient an opportunity to ask questions (Gregory and Mursell, 2010; Innes et al, 2018). The patient can withdraw their consent at any point.
The abdomen will need to be accessible from the base of the sternum to the symphysis pubis (Thomas and Monaghan, 2014). Avoid unnecessary exposure by covering the area with a blanket, and uncover only when you need to.
Equipment required
Patient positioning
Consider inspecting the hands, arms and face in the patient's preferred position. For the abdominal examination, the patient should ideally be recumbent with their arms resting at their sides (Thomas and Monaghan, 2014; Bickley and Szilagyi, 2017; Innes et al, 2018).
General observations
In the first article in this series, Kirk (2020) recommended making generic observations. Below are some GI signs (this list is not exhaustive):
Hands
Examine the patient's hands for:
Reflection
Consider the relevance of any positive findings
Arms
Examine the patient's arms for:
Face
Ask the patient to open their mouth and look for:
Lymph nodes
Enlarged lymph nodes may be visible, so inspect before palpation (Thomas and Monaghan, 2014). Palpate the lymph nodes lightly with the fingertips, ideally standing behind the patient (Thomas and Monaghan, 2014). Palpate the following cervical and supraclavicular lymph nodes (Figure 1):
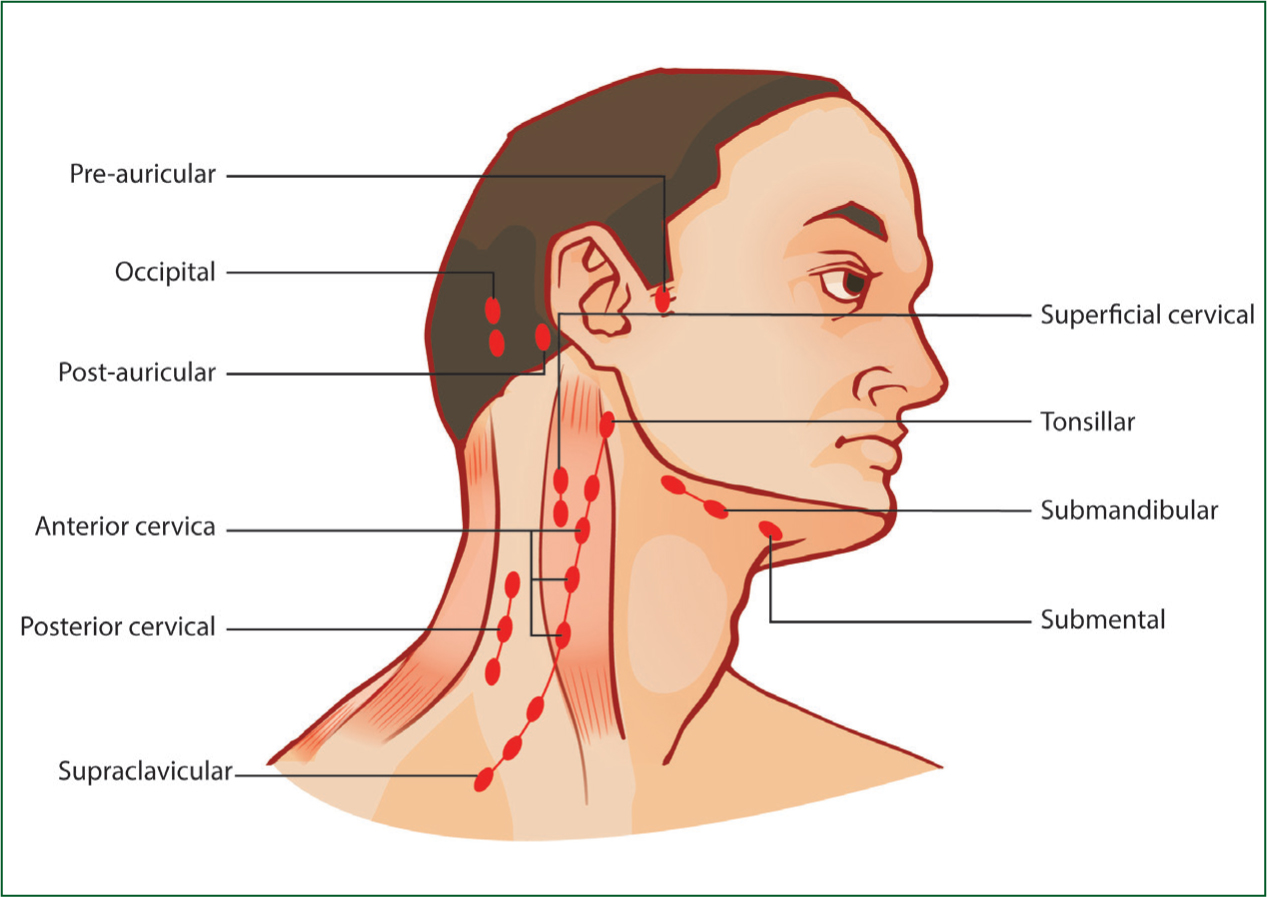
Record the site and number of palpable nodes, and if any are tender (Thomas and Monaghan, 2014).
Reflection
What is Virchow's node suggestive of?
Abdomen
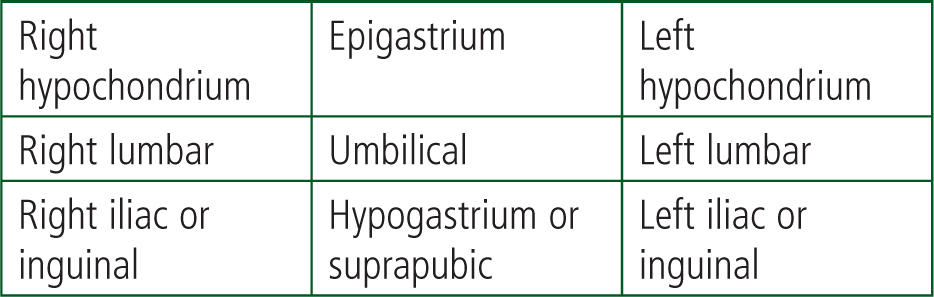
The abdomen can be artificially separated into nine regions (Innes et al, 2018) (Figure 2) or four quadrants with imaginary lines crossing at the umbilicus (Thomas and Monaghan, 2014) (Figure 3). A focused abdominal examination includes inspection, palpation, percussion and auscultation (IPPA) or IAPP (inspection, auscultation, palpation, percussion); this text uses IPPA.

Reflection
What organs lie under each of the nine abdominal regions?
Inspection
Look at the abdomen for signs such as:
Palpation
Whether you decide to palpate using all nine regions (Seidel et al, 2010) or all four quadrants (Thomas and Monaghan, 2014), record the location of any positive findings.
Ask the patient to use one finger to show where any pain is; palpate that area last. Ask the patient to let you know if they feel any discomfort during the examination and observe the patient's face for signs of pain (Thomas and Monaghan, 2014).
Light palpation
Use your fingertips and the palmer aspects of your fingers (Thomas and Monaghan, 2014). Hold your hand flat, and gently press into the abdomen, flexing and extending your metacarpophalangeal joints (Thomas and Monaghan, 2014). Do not dig in or prod with your fingertips. If light palpation elicits pain, assess for rebound tenderness (Thomas and Monaghan, 2014). Note any pain, masses or other abnormalities and assess for guarding (Thomas and Monaghan, 2014).
Deep palpation
Re-examine the abdomen using the same technique, but apply more pressure. If light palpation elicited pain, you may not be able to do this more deeply. Deep palpation may allow you to feel stools in the sigmoid colon (Thomas and Monaghan, 2014). Note any masses or structural abnormalities.
Palpation of the organs
Aorta
Place your hands either side of the outermost palpable margins in the midline above the umbilicus to assess for a pulsatile mass (Thomas and Monaghan, 2014).
Liver
Use the flat of your hand to start palpating from the right iliac fossa up towards the right costal margin (Thomas and Monaghan, 2014). Ask the patient to take slow, deep breaths. Bring your hand up towards the costal margin with every breath in and the liver should descend (Thomas and Monaghan, 2014; Innes et al, 2018). When the liver is just above your hand, your index finger will hit the liver edge. If not felt, repeat the process. Once you have identified the liver edge, note any enlargement or surface irregularities.
Spleen
Use a similar technique as with the liver; palpate below the umbilicus and navigate up to the left costal margin (Thomas and Monaghan, 2014). You may need both hands for this, so place your other hand behind the patient's left lower ribs, which pulls the ribcage forward (Innes et al, 2018).
Gallbladder
Your hand should be perpendicular to the right costal margin, at the lateral border of the rectus abdominis, at the tip of the ninth rib (Thomas and Monaghan, 2014). Palpate away from the midline. Pain on palpation during deep inspiration, with no pain on the left, is a positive Murphy's sign and indicates cholecystisis (Thomas and Monaghan, 2014).
Kidneys
Put your left hand behind the patient on the right loin, and your right hand at the lateral border of the rectus abdominis, below the right costal margin (Thomas and Monaghan, 2014). Push deep in and ask the patient to take a deep breath and feel for the lower pole of the kidney (Thomas and Monaghan, 2014). Repeat for the other kidney.
Palpation of hernias
Most abdominal hernias have an expansile cough impulse (Thomas and Monaghan, 2014); a cough may result in a visible, palpable protrusion.
Bladder
Palpate from the umbilicus and inferiorly towards the symphysis pubis (Thomas and Monaghan, 2014). An empty bladder is not palpable.
Appendicitis
McBurney's point
Percussion
Density, such as an organ or a mass, will give a dull percussive sound, while gas in the bowel will sound abnormally resonant (Thomas and Monaghan, 2014). Percussion may help to identify enlarged organs that may not be palpable. Percuss all quadrants/regions.
You can percuss individual organs. An aide-memoire showing the quadrants/regions and their underlying organs may be useful.
Percussion technique
The middle finger of one hand is placed on the location with the other fingers abducted (Baker, 2016). The middle finger on the other hand should be used to strike the placed finger (Baker, 2016). Keep the striking finger curved in one position and move from the wrist. This skill is difficult to perfect.
Examining for ascites
Ascites presents as a distended abdomen, often with an everted umbilicus (Thomas and Monaghan, 2014; Innes et al, 2018). Percuss centrally and move laterally, listening for a change from a resonant to dull sound as gravity causes fluid to collect in the flanks (Thomas and Monaghan, 2014). Note where you detect dullness.
Test for shifting dullness. Ask the patient to roll onto the opposite side from where you percussed and wait for 30 seconds (Thomas and Monaghan, 2014). If ascites is present, gravity will move the fluid to the other side, and the dull area will now sound resonant (Thomas and Monaghan, 2014).
Fluid thrill
You need someone to help; it could be the patient. The assistant places the ulnar edge of their hand against the abdomen at the midline. Place one hand on one side of the abdomen at the midclavicular line, and use the other to ‘flick’ from the opposite side. A fluid thrill feels like a tap or ripple on the receiving hand (Thomas and Monaghan, 2014).
Auscultation
Bowel sounds are caused by gut peristalsis (Thomas and Monaghan, 2014; Innes et al, 2018). Place the diaphragm of the stethoscope just below the umbilicus and auscultate for bowel sounds:
Listen in each quadrant or region for up to 2 minutes if you have the time (Baker, 2016). If the patient is in pain, auscultate in the quadrant or region next to the pain, then move clockwise, auscultating over the pained area last (Baker, 2016).
Bruits
Turbulence of blood flow through vessels can be auscultated at several abdominal sites including:
Conclusion
Thank the patient and help them dress if necessary. Document your findings (Gregory and Mursell, 2010; Bickley and Szilagyi, 2017), discuss them with the patient and give them an opportunity to ask questions. This concludes your GI examination.