

Pre-hospital clinicians often have to deliver care to patients who are suffering from respiratory failure or impaired circulation.
In these circumstances, peripheral intravenous (IV) cannulation can prove difficult or even impossible (Petitpas et al, 2016). Intraosseous (IO) access offers a safe and quick alternative to the intravascular access route (Neuhaus et al, 2010). However, there are limitations and complications that need to be considered.
Intraosseous infusion
IO infusion is a method of administration of medications or fluids directly into the marrow of a bone (Figure 1).
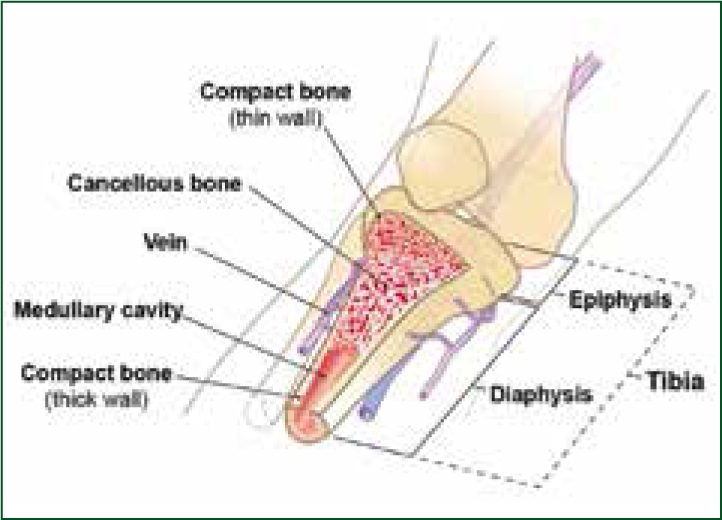
In contrast to other routes, it provides a ‘non-collapsible’ entry point to the central venous system (Tobias and Kinder Ross, 2010).
Anatomy and physiology
The bones that can be used for IO cannulation are those possessing significant amounts of ‘red’ and ‘yellow’ marrow. These can be found in every type of bone in varying amounts. Red marrow, or haematopoietic tissue, is transformed over time into the yellow marrow—this process begins at approximately 5 years of age (Paxton, 2012). Even though yellow marrow is less vascular, it still provides good absorption of medication and fluids, enabling clinicians to use this access route for patients of all ages (Bewick, 2017).
Site choice depends on local protocols and the equipment available. The two most common sites are the head of the humerus and proximal tibia (Soar et al, 2015) (Figure 2; Figure 3). Once a site is selected and fluid administered into the bone marrow cavity, it is drained through the intramedullary and emissary vessels into the central venous circulation (Figure 1) (Cullen, 2014).
Indications
Using the IO route depends on local protocols and the clinician's scope of practice must be adhered to. In life-threatening emergencies, the IO route is recommended where IV access is deemed unattainable within a short space of time (Soar et al, 2015; Samuels and Wieteska, 2016). IO cannulation should be considered initially in patients who have been intravenously cannulated many times, or who are recreational drug abusers (Bewick, 2017). An IO catheter should be removed within 24 hours of insertion (Montez, 2017).
Contraindications
IO access is contraindicated in the following circumstances (Phillips et al, 2010; Paxton, 2012; Petitpas et al, 2016):
Other considerations
IO infusion can be a complex procedure, therefore there are other aspects of patient care that must also be taken into consideration.
Pain
In most cases, patients requiring IO access are unconscious. However, pain needs to be considered in some circumstances if the patient is alert. Research suggests that patients who are conscious report a mild pain experience, 2.5–3.5 out of 10, when inserting the IO catheter which is comparable to pain experienced in peripheral IV catheter insertion (Phillips et al, 2010). The surveyed patients reported the humeral site to be the least painful (Paxton, 2012). Pain was reportedly more significant during the infusion and dependent on the pace of administration (Bradburn and Gill, 2015).
Training
A study by Hallas et al (2012) suggests that despite clinicians being familiar with IO access, they are reluctant to use it. Of the 759 clinicians surveyed, 23.5% were dealing with a patient whom they believed would benefit from IO cannulation but this had not been performed. Reasons given included the shortage of required equipment (48.3%), and lack of confidence or inadequate training (32.6%) (Hallas et al, 2012).
Complications
IO cannulation rarely results in complications, with literature suggesting that complication occurrence is less than 1% (Bewick, 2017). Most complications are a consequence of poor insertion technique or improper use (Cullen, 2014; Petitpas et al, 2016; Bewick, 2017). Complications include:
Performing the procedure
There is not one clear guidance on how to insert the IO cannula. This is a result of variation in patient age groups and anatomy (Tobias and Kinder Ross, 2010). The clinician performing the procedure should adhere to universal infection control precautions. If the setting allows it, the clinician's hands should be washed; the site cleaned using the Aseptic Non-Touch Technique (ANTT®); appropriate personal protective equipment (PPE) worn; and a sharps bin made ready.
Site and needle selection
There are many potential insertion sites for IO access. As mentioned, the most common in pre-hospital care are the humeral head and proximal tibia. It is important for the clinician to become familiar with local protocols, procedures and available equipment—some devices are designed for use on particular anatomical sites (Paxton, 2012; Petitpas et al, 2016).
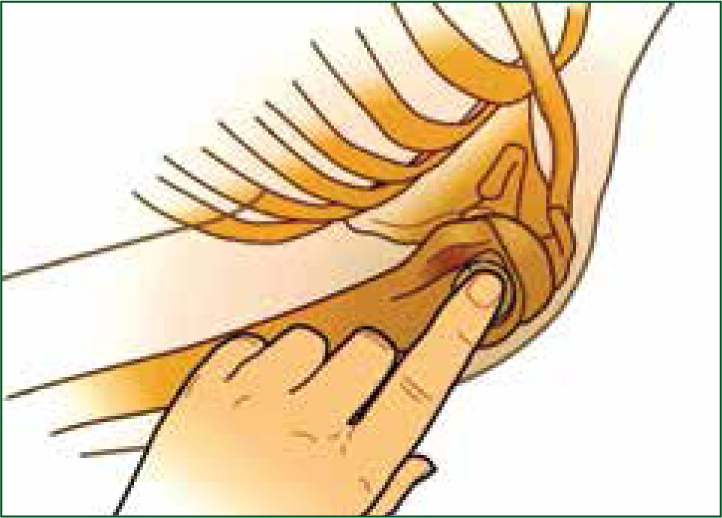
Humeral head
See Figure 2 and the following instructions:
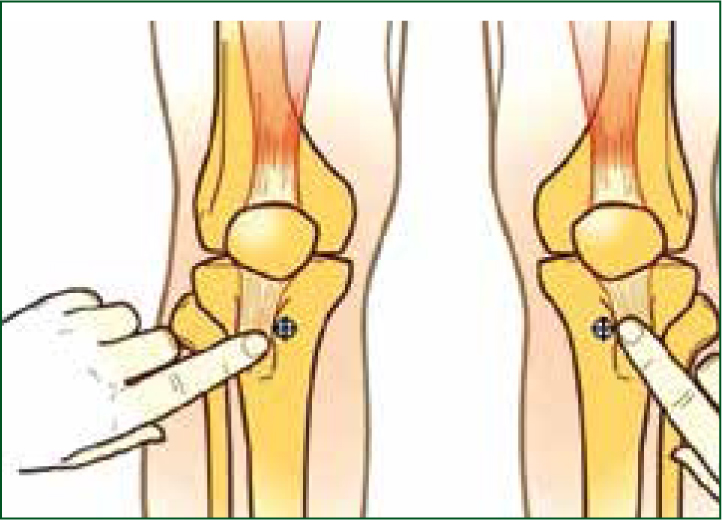
Proximal tibia
See Figure 3 and the following instructions:
Other techniques
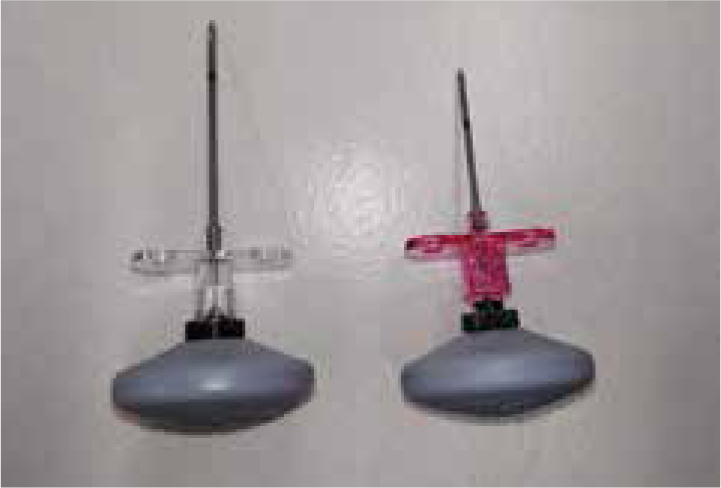
See Figure 4; Figure 5; and Figure 6 and their corresponding instructions in Table 1 for the Cook intraosseous needle insertion technique (Paxton, 2012; Petitpas et al, 2016; Bewick, 2016).
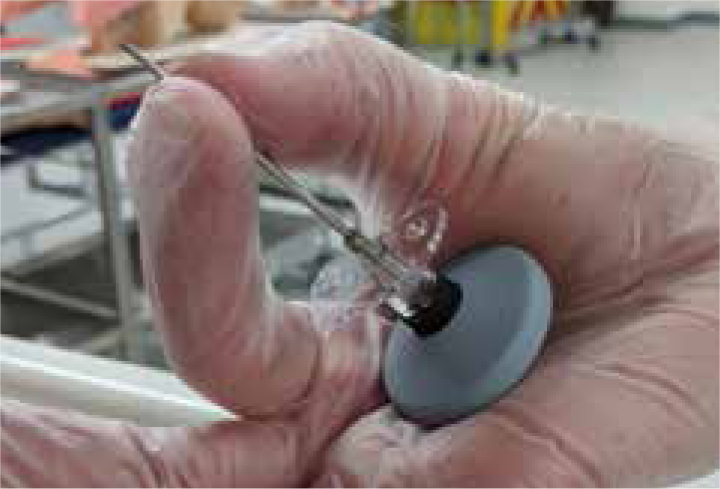

| Select the insertion site |
| Select the correct size of needle (Figure 4) |
| Clean the site |
| Consider an anaesthetic (as per local policy/guidelines) |
| Place the handle on the palm of your dominant hand and stabilise the needle by holding it approximately 5 mm below the tip of the needle with your thumb and the index finger (Figure 5) |
| While stabilising the limb, begin insertion of the needle by applying firm downward pressure into the bone. The needle should point slightly away from the joint, directed distally in line with the axis of the selected bone (Figure 6) |
| Continue advancing the needle by applying downward pressure with the steady clockwise rotation of the wrist until a slight give, or ‘pop’, is felt |
| Remove the stylet by holding the catheter and turning the handle anti-clockwise; dispose of the sharp |
| Check gently if the catheter is firmly inserted into the tuberosity of the bone (the needle should feel like a nail in a board) |
| Attach the tubing with a 3-way cap to the catheter and aspirate the bone marrow (confirming intramedullary needle position) |
| Flush the catheter with 5–10 ml of 0.9% sodium chloride |
| Stabilise the catheter |
| If required, remove the IO needle by traction upwards with gentle rotation from side to side; dress the insertion side as any other minor laceration |